

*** NOTE ***
I have received some backlash and hate mail regarding the content of this post.
Please remember that this website is a blog run by me, Grant Tiller and as such I am entitled to my own opinion, which is what I am sharing here.
My opinions are based on the kit I bought and was sent by Electrex World, and my subsequent interaction with the company.
I am very well aware that there are many kits sold, and are out there working well.
This is a great ignition system for trials bikes and the like – no doubt about that.
Also, my experience of this kit and it’s behavior I believe is specific to the Norton and it’s primary drive ratios.
The Triumph, BSA etc… is different, so the experience may well be significantly better.

This is a write up of our experience with Electrex World.
For the Norton Commando + Electrex World Wiring Diagrams please click here
The Company
We bought an Electrex World STK-102D-DC ignition kit for a Norton 650ss Cafe Racer project we were doing.
Their website says:
Electrex World has been manufacturing motorcycle electrical components in the UK for over 25 years.
99% of our products are manufactured by Electrex World in the UK using state of the art equipment.
Our products use high quality components and have proven to be very reliable.
The idea of this kit is that it replaces the ignition system (Lucas Magneto in the case of the 650ss) as well as replaces the charging system (Lucas Alternator, Rectifier and Zener Diode in the case of the 650ss) and replaces it all with a much simpler custom alternator, a coil on the stator plate for a CDI ignition system and with a crank mounted ignition trigger built in.
Electrex World are advertising in all the bike mags at the moment, and with lines like:
We are proud to be Original Equipment Manufacturers for several companies and we sell to many distributors throughout the UK as well as exporting to Europe, Canada, America and Asia.
They seemed like a well sorted outfit!
The Order
We placed the order for the kit at the start of September 2019 – the website showed that the kit was in stock.
We had an email from them on the next working day saying :
As you know, we are currently out of stock for this part, therefore we will send your part, when is ready.
We didn’t know, but ok.
Checking the website the following day showed that the kit was now listed as out of stock.
We waited, and waited, then waited some more and finally after no communication, we sent them an email during October 2019 chasing it up.
Had a reply the next working day saying:
We are very close now, just undergoing final testing as we have included some new/different parts from previous versions.
We waited, and after no communication, we sent them another email chasing it up in November.
I was annoyed at this point, because all along, their website showed high stock numbers of the individual component parts – which I pointed out to them in the email:
- Internal Rotor RO100 £95.00 65 in stock.
- Stator EWST-0079-HPI0 £95.00 6 in stock.
- CDI CD041 £75.00 155 in stock.
- Regulator Rectifier RR02 £45.00 20 in stock.
- HT Coil HT2 £35.00 111 in stock.
- Switch SW11 £15.00 152 in stock.
No reply, or even acknowledgement of the email.
So in December, we sent them yet another email.
Pointing out this time the latest stock levels of the component parts:
- Internal Rotor RO100 £95.00 59 in stock.
- Stator EWST-0079-HPI0 £95.00 6 in stock.
- CDI CD041 £75.00 155 in stock.
- Regulator Rectifier RR02 £45.00 74 in stock.
- HT Coil HT2 £35.00 495 in stock.
- Switch SW11 £15.00 2071 in stock.
The kit arrived the next working day (still no response to the email though)
For a product that showed as in stock when we ordered it, and in this day and age where the expectation is one of next day delivery, for me, a three month wait is not acceptable.
First Impressions
On un-boxing the kit, the first thing I noticed was how short all the cables were – absolutely every cable was going to have to be extended in order to fit it to the bike.
I wanted to put the coil under the fuel tank and as far forward as possible – keeping the HT leads as short as possible.
The Alternator stator on the end of the crankshaft (obviously)
The CDI unit up under the front of the seat
The Regulator/Rectifier under the hump of the seat
The Capacitor (we decided to go for a battery-less option) right next to the reg/rec
So nothing too out of the ordinary in terms of component placement.
Extending the wires is not an issue for me, as I could easily solder and heatshrink the wires.
It did spring to mind though that this wouldn’t be ideal for the hobbyist, and it gives potential for unreliable connectors or poor quality crimps to be used – leading to bad connections, and/or moisture ingress.
I set about extending all of the wires.
Whilst I was doing this, the next thing I noticed that was the CDI unit was made by Horse Power Ignition

It seems that this critical part of the puzzle (the CDI unit) is part of the 1% that is not manufactured by Electrex World – I guess the ignition coil and kill switch also come in under that 1% too!
The Horse Power Ignition website is quite useful, as you can view information and stats about the CDI unit which Electrex World don’t share on their site, or in their instructions.
The direct link to the 068C041 CDI unit is here
I have also put a copy on my page, just in case the original disappears!
Here is a copy of the HPI 068C041 CDI unit instructions:

The CDI unit has a nice quality 3-pin Superseal connector on it.
This in turn goes to about two inches of wire, then three bullet type connectors which join to the Alternator stator.

I thought having two sets of connectors so close to each other like this was really poor design.
I have some spare Superseal connectors and the proper crimp tool, so did the job properly (since I was extending the Alternator cables anyway)
With the cabling all ready to go, we could now set about fitting the kit to the bike.
Instructions and Help
Here is a copy of the Electrex World STK-102D-DC instructions:

Here is a copy of the Electrex World STK-102D-DC troubleshooting guide:

I wasn’t impressed at all with the quality of the instructions.
I get it that the STK-102D-DC kit covers many models of bike in a single kit, but I felt that the instructions lacked a lot of the detail that I would have found useful.
There is a great video on YouTube which was made by Classic British Spares
You can see the video by clicking here:

I didn’t discover this video until after I had fitted the kit, but handily it covers some of the gotchas and things to look out for, which Electrex World don’t seem keen to point out!!!
So kudos to the guys over at Classic British Spares for taking the time to put this together!
Fitting
First thing we found when we were test fitting the rotor to the end of the crankshaft was that it sat up against the belt drive pulley.
Well, all of the bikes that this kit was designed for are chain drive primaries, so this issue can easily be excused (although, belt drives are a pretty common retrofit these days, so I am surprised that Electrex World don’t cater for it, or even mention it)
To be crystal clear, in no way do I blame Electrex World for the poor way that this particular kit fits the bike.
However, for Commando owner with a triplex chain (ie factory standard) you may also run into similar fitment issues, as the spacing of my Bob Newby belt kit is the same as standard Commando primary drive)
The two 5mm spacers that come in the ‘fitting kit’ didn’t even start to address this issue, so we made up a spacer of our own.

This new spacer sits inside the tapered crankshaft pulley, tight into the taper and up against the woodruff key.

The next stage was to make three new spacers for the alternator stator, as the three supplied in the ‘fitting kit’ were too short!

The length of the spacers are such that there is an air gap between the alternator stator plate, and the crankshaft pulley.
It is a good idea to make sure you allow a little extra for any crank flex here!

The standard bolts that came off the bike were now too short, so three new bolts had to be sourced.
These bolts are waisted in order for the alternator stator plate to be able to be moved so that it is concentric about the rotor – so the plain portion of the new bolts had to be turned down on the lathe.
We also had to turn down the diameter of the head of the three alternator bolts, as well as reduce the height of the heads, because they were now stuck out so far they fouled the primary cover.

When test fitting the rotor, we found that the rotor nut also now fouled with the primary cover.
So we reduced the height of the rotor nut in the lathe, as well as increased the depth of the indentation in the top of the rotor itself.
Note: this rotor does not use a keyway/woodruff key. Instead they ship a collet in the fitting kit, which turns the plain shaft into a tapered one.
You then use one or both (i needed both) of the 5mm spacers supplied in the fitting kit to ensure that there is a sufficient air gap between that rotor and stator back plate.
Do not measure the thickness of the backplate, then the thickness of the spacers like I did – it ends in tears!
It’s covered all too briefly in the instructions, but in much more detail in the Classic British Spares YouTube video that the air gap between rotor and stator is dictated by a small ‘lump’ cast into the backplate.
I have highlighted this ‘lump’ in green:

If you don’t set the air gap to this ‘lump’ you will crack the stator backplate when you tighten up the rotor. I have highlighted my cracked stator plate in orange!
Easy to see now, but not at all obvious at the time!
Before tightening up the rotor to the torque spec (usually 70 ft/lbs for the factory setup, but the Electrex World instructions detail ‘about 40 ft/lbs’) it is important to get the rotor roughly in the right place (fine tuning can be done afterwards using the slots on the stator plate)
To do this I attached my timing wheel, and found true top dead centre using a piston stop.

We then line up the marks on the rotor and stator to read 28 degrees (standard for a Norton Dommie)
This is an unusual way to set the timing on an electronic ignition system – you usually set the piston to 28 degrees before top dead centre and go from there.
Electrex World promote this in a “we’ve done all the hard work so you don’t have to” kinda way, but in reality setting it up is no more or less complex, it’s just different.
At this point, we can torque up the rotor to spec and make sure that everything is clear and not rubbing.
Double check the timing wheel is at true top dead centre, then make sure the stator plate is set right and is 100% concentric about the rotor itself.
Then we could torque up the three stator bolts (at 15 ft/lbs)
Wiring
With the tough bit done, it was then a simple case of placing the other components, and plugging it all in.

The dual output single coil attached to the headsteady, and tucks neatly up and under the tank.
It’s not visible from the side of the bike at all!

Here you can see the CDI unit tucked up above the oil tank.
With the seat on, it puts the unit between the front of the seat and the back of the fuel tank and away from the direct heat of the engine.
It’s difficult with a cafe racer to hide everything out of the way. Half the appeal of a bike like this is the simple and uncluttered look.

The final items were the regulator/rectifier and capacitor unit.
The reg/rec is bolted onto a nice heatsinking plate, and in turn bolted to the rear mudguard.
The capacitor is used in lieu of a battery (we had a Shorai Lithium-based battery ready to go there, but Electrex World recommend not to use one)
You’ll notice in the above pics that there are two CAUTION – negative earth stickers.
They are both hidden under the seat/fuel tank, but i thought it would serve as a gentle reminder for the next owner, since most of the bikes of this era are positive earth.
I made the decision to go up the negative earth route to ease the addition of LED lighting or anything else ‘modern’ and ‘cutting edge’ that a future owner may like to add.
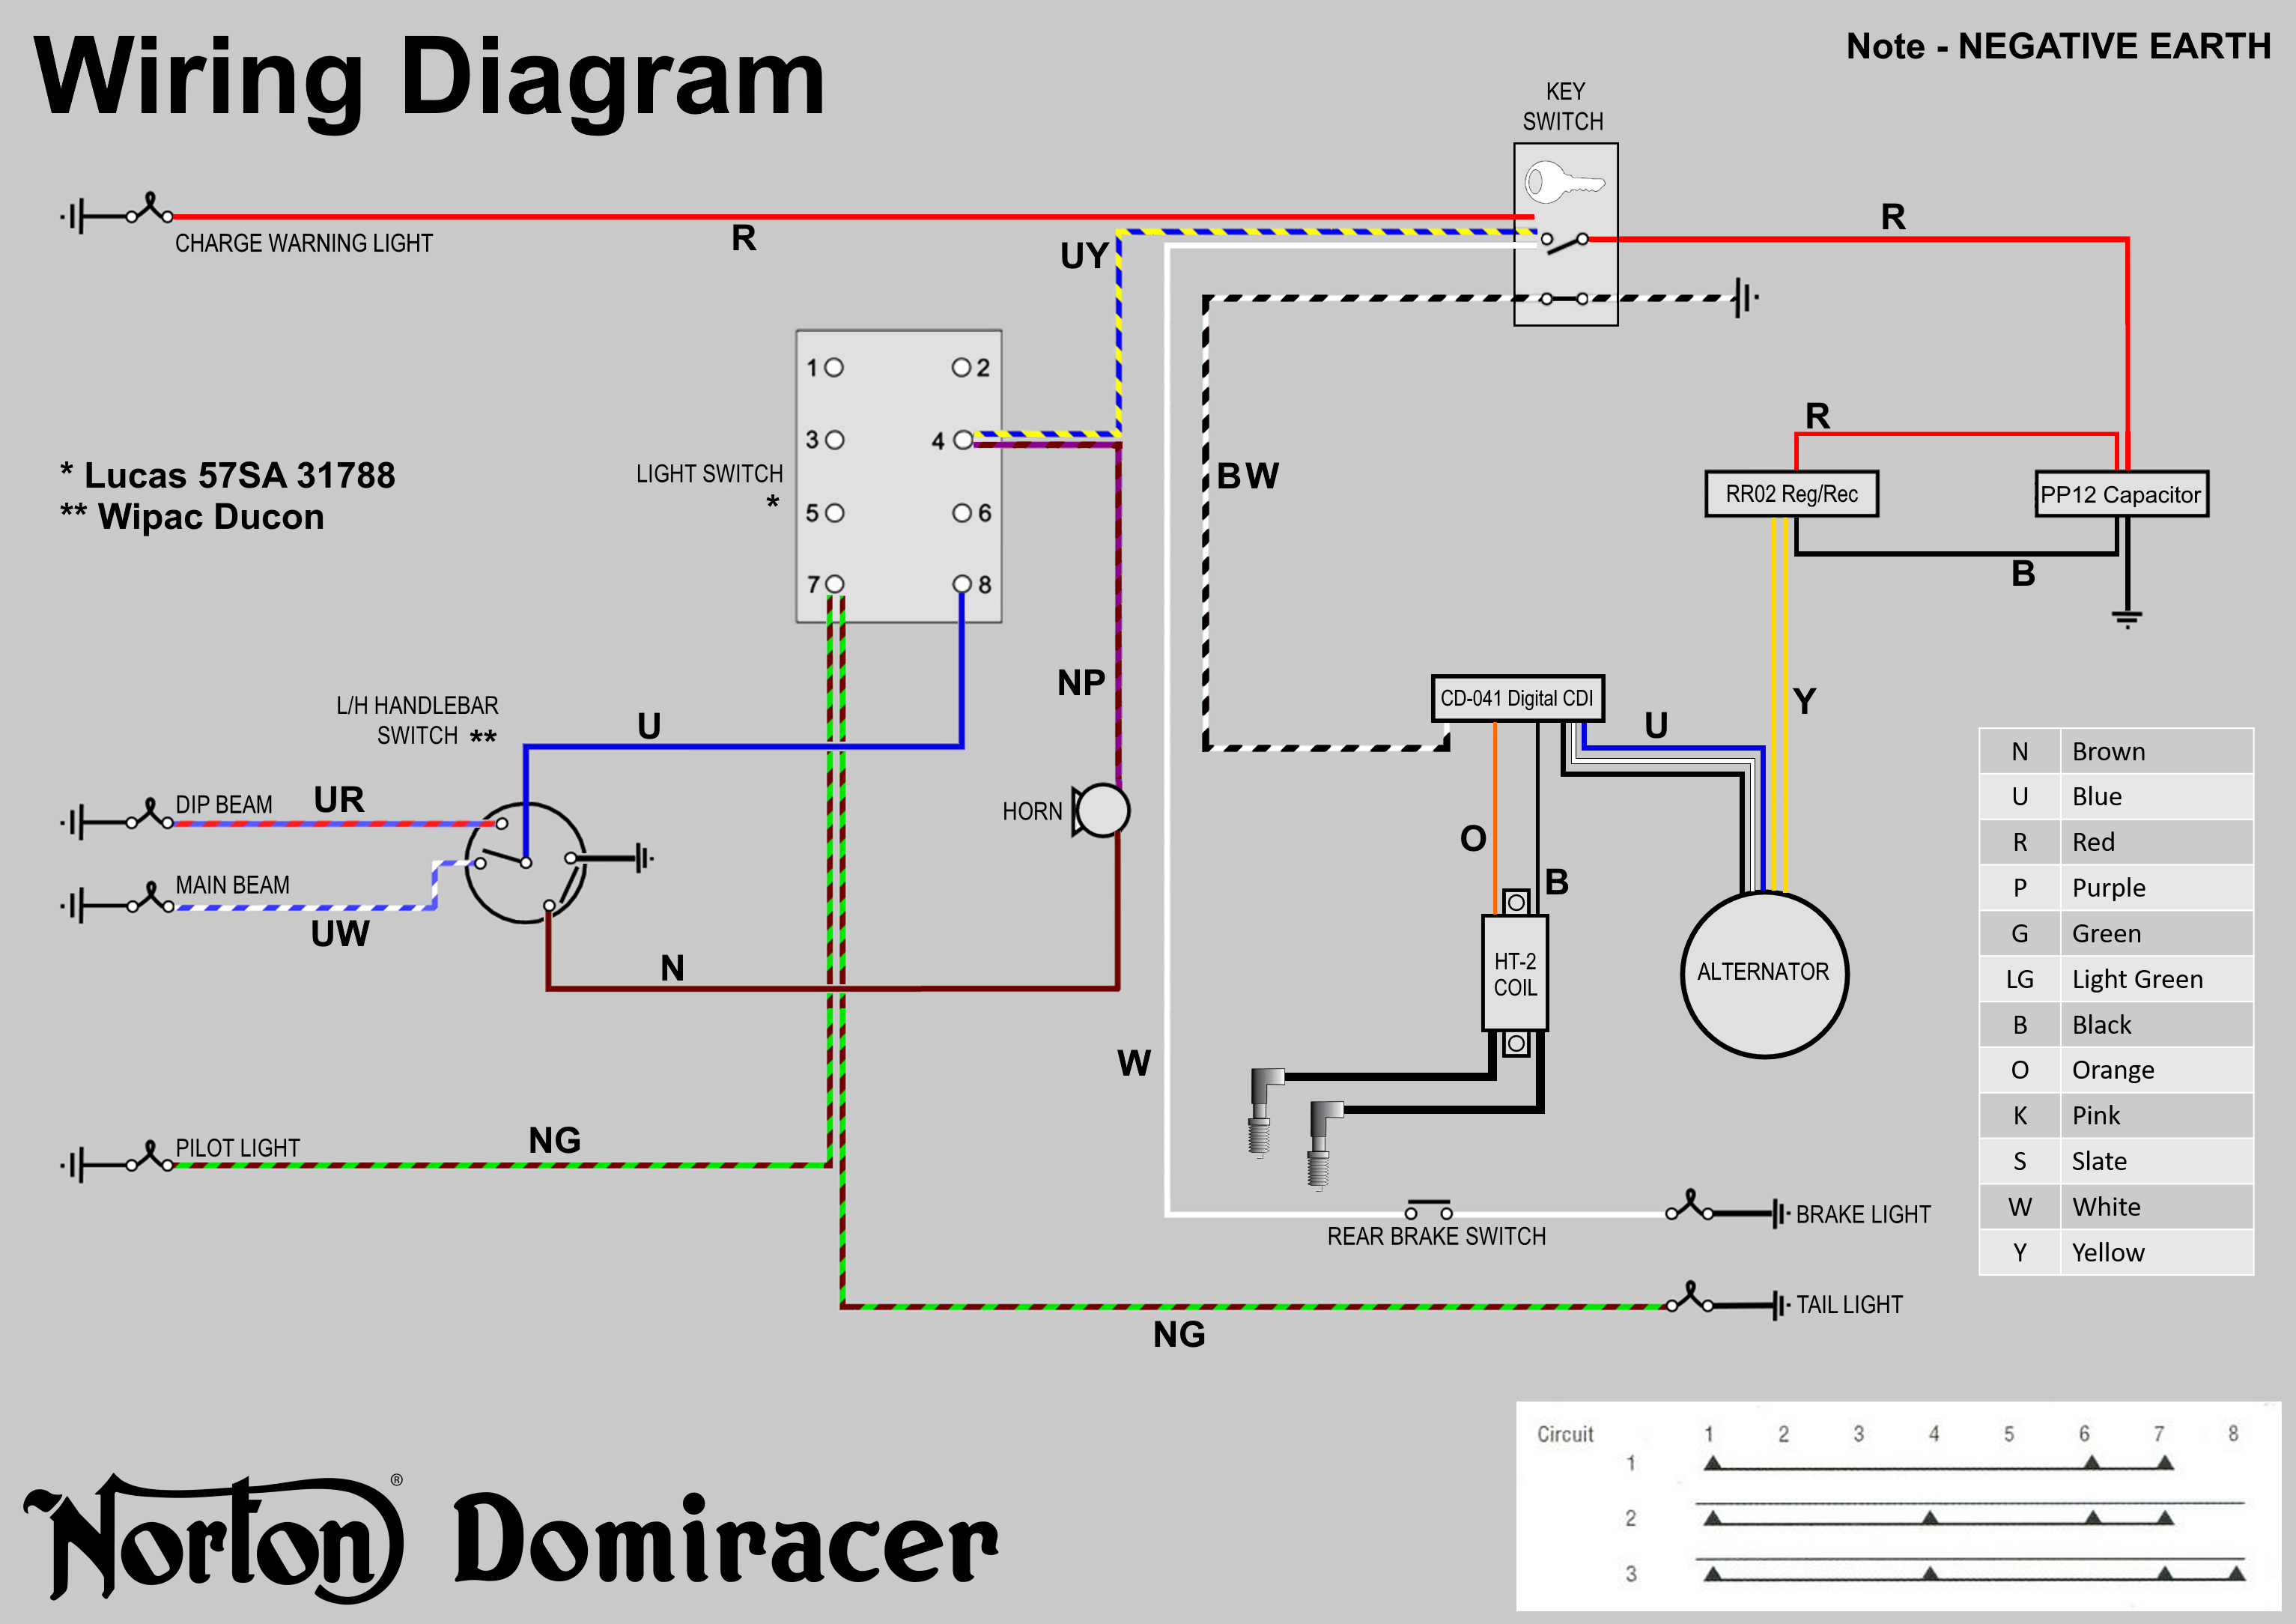
Wiring Diagram
Here is a Wiring Diagram for the bike with the Electrex World STK-102D-DC kit fitted – it’s really simple!
If you are reading this, and are in the process of fitting an Electrex World STK-102D-DC kit to a Norton Commando, I have made Wiring Diagrams using factory wiring please click here
Starting
So with everything wired up, it was a simple case of putting the tank, seat and exhausts back on and firing the old girl up!
Fuel taps on, tickle the carbs and kick the bike over twice.
Then turn on the ignition switch and give it one big, full kick.
Nothing.
A few more big kicks, and still nothing.
With this unit, is says in the trouble shooting guide:
- No Spark visible on kick over.
- A spark isn’t always visible when kicking the bike over and this is normal.
- The CDI produces a high voltage short duration spark, this intensifies as RPM increases, as opposed to points which produce a low voltage long duration spark.
And it was absolutely right, no sign at all of a spark!
So we pulled the spark plugs, and kicked the bike over rapidly.
I could see that the Charge Warning light was glowing red at this point, indicating there was at least something coming out of the alternator.

I put the multimeter across the low tension side of the coil, and could see there was a voltage reading as we were kicking the engine over, again confirming that something was coming from the alternator iva the CDI unit.
Note: don’t expect to see 12 volts on these (the coil has a primary side resistance of on 0.6 ohms, which is very very low, so my guess is it will only ever receive just a few volts from the CDI unit)
Now bear in mind, this bike used to have a magneto on it and it started pretty easily.
It just didn’t run very well because the automatic advance unit was not only sticky, but beyond economic repair.
On the grounds a new genuine Lucas AAU was £270, we thought that the Electrex World STK-102D-DC kit would be a really nice upgrade for a similar price.
So the plugs went back in, and we continued kicking it over.
Bang – a major kickback which nearly threw my Dad across the workshop and a big puff of smoke out of the carbs.
That’s great news (not for my Dad) because at least we have combustion!!!
Kickbacks are horrible, because you immediately lose trust in the bike and you start to resent it and hate it.
So we put the timing wheel back on again, found true top dead centre with the piston stop and checked that the timing marks were spot on – they were!
Back to kicking it over, and after the second big kickback and another dozen or so kicks, we got the engine started.
It was popping and banging like the timing was badly out, but at least it was running!
Also there was barely a glow from the headlight when i switch it on.
The horn was whisper quiet, and didn’t work at all when the headlight was on.
These are issues that can easily be overcome – converting the lights to LED, and using a 6 volt horn are easy and relatively low cost fixes.
I knew the electrical output of this alternator was very low, but really hadn’t planned on it being quit this dismal in all honesty!
So the primary cover came off again, and i moved the timing to 31 degrees – this is standard practice on a Commando when you are going from points ignition to electronic ignition, and as far back as the Boyer Bransden units that were sold as upgrades in the 70s this was detailed in their instructions as the thing to do.
This time round, the kickback was even worse and the cloud of smoke even bigger (if you think about it, you are setting the spark plug to fire at 31 degrees before top dead centre instead of 28 degrees before top dead centre. A kickback is when the engine is trying to fire backwards (ie in reverse rotation) so the combusted fuel is pushing the piston back down too early)
So we tried something extreme and set the timing marks on 24 degrees before top dead centre.
This time the kickback was much much less, although surprisingly it was still happening.
After another dozen or so kicks, sure enough the engine bursted into life. It was running a lot rougher this timing – popping and banging in the exhausts and carbs right through the rev range, and indicating that the timing was well out.
So we set it back to 28 degrees.
Support
I emailed the Electrex World technical support address detailing my contact details, and previous order number in the mail. I asked them a few questions, describing clearly my symptoms and what I had tried to rectify it. I also requested details of the advance curve (so that I could check they were saying the same as the Horse Power Ignition website said on the instructions for the HPI 068C041 CDI unit (it was possible they have a customised version of the CDI unit with a different advance curve, but it turns out they don’t)
A day or so later i had a mail back from ‘Bob’ saying:
this depends on which CDI you have, if you can tell me that I can send the advance curve details
Well I was a little surprised that he didn’t know what version i have on the basis they sold me the kit just a couple of weeks prior, but i mailed him back straight away with the details.
He replied with the following message:
very sorry about this but we think they may well be a problem with the CDI, we are running some tests here to try and confirm the issue and identify a replacement CDI if we need one
After a few days, I heard back with the following:
to be sure which CDI you have I will need a photo of it displaying any numbers on it
Which meant taking the unit off the bike so they I could photograph the sticker on the bottom of the CDI – don’t forget, this is the same company that sold me the kit a couple of weeks before!

I sent them this pic by return, and received the following reply:
thanks for this, sorry to say that this is the good CDI that we using as a replacement for the problem one.
Therefore I believe you original problem is not a cdi issue.
I did notice a small difference in the instructions for the HPI 068C041 CDI unit versus the instructions for the Electrex World STK-102D-DC kit in that the black wire on the coil is wired differently.
In the HPI installation manual for the 068C041 it states as follows:
HT-coil orange Connect the HT-coil to the frame. Plug the orange cable to the HT-coil,
black ring Connect the black cable with ring to the bracket of the HT-coil and to the frame.
In the Electrex World STK-102D wiring diagram it shows the orange and black going to the two terminals on the dual tower single coil.
So I wondered if there was an issue with the CDI unit getting a good path through to the ground electrodes on the spark plugs.
I sent the following diagram to Bob at Electrex World technical support:

I asked Bob if he sees any harm on benefit in adding an additional black wire to earth as per my diagram.
I got this reply one week later:
Hi, yes you can add the additional earth but it really shouldn’t be needed.
The black wire to/from the CDI is earthed internally.
Also, it doesn’t matter which way around the Orange and Black cables are attached to the HT coil.
So I tried it anyway and sure enough it made no difference at all (but, with the exception of the Norton Commando, you can never have enough earths on an old bike)
We also tried resistor spark plugs WITH the resistor spark plug caps supplied in the Electrex World STK-102D-DC kit, as I noted in the instructions for the HPI 068C041 CDI unit that they say in a big warning box at the bottom of the page:
This is a digital CDI. Use resistive spark plugs and spark plug caps. (typical 5KΩ)
I updated Bob at Electrex World technical support with my findings, together with a summary of everything i have tried.
I haven’t heard anything more from Bob – consistent with the level of service received prior, as well as comments about poor communication I have since heard from others.
Conclusion
I am really disappointed with the Electrex World STK-102D-DC kit – what looks on a page as a great solution has turned out to be a really poorly executed box of bits.
Not only are the instructions very poor (and we are pretty competent in the workshop) but the service from Electrex World has been absolutely disgusting.
This product is not fit for purpose.
I have since done some further research, and have asked some more questions about the Electrex World STK-102D-DC kit and it appears that it could be a Norton specific issue.
The way the gearbox and primary drive ratios work out, you are not getting enough full rotations of the engine to get a decent charge in the CDI system for it to power up and produce a spark.
Having now been there and done that (and Dad has the bruises on his legs to show it) that opinion actually makes clear and perfect sense.
Obviously no mention of that on the Electrex World website or within their poor excuse for documentation!
But for us, the bike will be having the Electrex World STK-102D-DC kit removed, and it will be replaced with an electronic ignition and standard Lucas Alternator.
Can I recommend Electrex World to anyone looking for a charging and ignition solution for their classic bike?
No. Absolutely not.
The kit is poorly designed, the product doesn’t work and the service has been totally disgusting.
Zero stars and thumbs down from me.

Hi,
I had an system fitted to my Greeves challenger by name tab engineering it is very difficult to start, and kicks back horrendously on every kick, although it starts before my stamina runs out, it will not tickler any suggestions
Hi Pete,
That’s a weird one – most of the reports I hear for trials bikes and the like are very favourable, so I am a little surprised that you are experiencing these kind of issues.
The issues we ran into on the Dommie, I have since heard similar stories from others trying the same kit on Dommies and Atlases. We now absolutely believe it is entirely down to the ratios of the primary drive.
I.e., you are not getting enough revolutions from one swing on the kickstart, so there is not sufficient charge generated to start the bike, resulting in a kickback on the subsequent attempt.
However, this shouldn’t be the case for you!
The CDI coil is a lot larger in your Electrex kit, as I am assume your bike isn’t bogged down with lights or anything else?
If it is kicking back time and time again, try taking out some of the ignition advance so that your spark is nearer to top dead centre, and try again.
Hi Pete, I know this is a bit late in the day, but I believe there’s an issue with timing on the Electrex World single-cylinder product. Did you ever get this resolved?
Hi,
no the issue is still ongoing, i have 3 Greeves challengers all with Electrex units all with the same problem if i cannot resolve the problem i may go back to points.
Unfortunately i am unable to remove the flywheel even with the recomended puller , it has stripped the threads from the 3 designated pulling points. I think the exesive kickbacks have been severely damages the keyway.
i still think the Unit fitted is crap Without predudice.