

Dave Parker (User DRP from the Access Norton forum) has requested a custom wiring diagram for his bike.
His bike is a 1973 Commando 850 Roadster, and it’s had a few upgrades over the years.
Electric Starter

Matt Rambow and his team at Colorado Norton Works make some beautiful stuff, and their Electric Start Conversion for the pre-MK3 Norton Commando is no exception.
The cNw kit, found here is actually very reasonably priced at $2,795 if you consider that it includes a belt drive primary.
The pics are from Matt’s site (not Dave’s bike)

As always with Colorado Norton Works, the quality of the fit and finish is second to none.
If you don’t want a highly polished finish, there are options for satin and matt black too.

Matt supplies a starter button with his kit, as the quality of the original switches were dubious when they were new. That makes it difficult for Matt to support, and guarantee the reliability, hence shipping his own.
I have drawn Dave’s wiring diagram to retain the original Lucas switch – which is something that most people prefer to do.
Electronic Ignition

A decent Norton Commando upgrade is to move from the old points-based ignition system over to Electronic Ignition.
A popular unit these days is the Pazon Sure-Fire

These are popular for two reasons:
- COST – the are one of the lowest price units available on the market at the moment, and the come with an amazing seven and a half year warranty!!!
- RELIABILITY – people are nervous of the ‘shake and bake’ units like the Tri-Spark, where everything is all in one single, miniaturised unit behind the points cover. The Pazon is a carbon copy of the Boyer Bransden unit with a stator plate (Pazon call it the Ignition Trigger) and a separate box of electronics (which Pazon call the Ignition Module)


In fact, the similarities with the Boyer Bransden units don’t end there – all the wires are the same color too!
Actually, Andy and Debbie from Pazon both used to work for Boyer Bransden!!!
Moving from points to a Pazon Sure-Fire electronic ignition is a pretty simple upgrade.
Originally, the points make and break the positive (earth) side of each coil in turn.
You’ll note in the wiring diagram below that the Ballast Resistor and Condensers have been removed as part of the conversion to Electronic Ignition.
The color coding of the wiring is simple:
| Wire Colour | Description |
|---|---|
| Red | this is the positive feed (earth/ground) to the Pazon, and is usually picked up from the red wire that goes to the Coil positive terminal |
| Black | this is the negative supply FROM the Pazon TO the coils |
| White | this is the negative feed to the Pazon. This joins in to the White/Yellow that is the kill switch on the handlebar switch cluster. |
| Black/Yellow and Black/White | these go from the Pazon Ignition Module down to the Ignition Trigger that sits behind the points cover. |
From a wiring perspective, the most important thing to note is that you will be moving from a pair of coils that are wired in parallel to series.
The Pazon electronic ignition system uses a concept called “wasted spark” – with the two coils wired in series, they are energized together on every rotation of the camshaft.
However, Dave has paired his Pazon ignition with a dual output single tower coil – so there is no worry with moving the pair of single 6-volt coils to a series setup for wasted spark ignition as with a normal points conversion.
One point worthy of note with dual output single tower coil conversions is sparkplug choice.
Most people don’t realise that with this type of coil, the sparks at the sparkplugs jump the opposite way on one lead.
So for one sparkplug, the spark jumps from the centre electrode to the ground electrode (as you’d normally expect)
However, for the other sparkplug, the spark jumps from the ground electrode to the centre electrode (which is opposite to what you’d think)
Therefore, when choosing your sparkplugs, you need to bear this factor in mind!
Many people go for precious metal plugs – like platinum or iridium.
The benefit of these plugs is longevity – they simply last longer.
With the spark jumping from the ground electrode to the centre electrode, this benefit is totally lost.
The answer is to run double platinum or similar plugs, where a precious metal is used at BOTH the centre electrode AND the ground electrode.
My personal preference is the Denso VW22 plug – this has a platinum pad on the ground electrode and an iridium centre electrode.
I like Densos as they just seem to last forever – I use the IW22 on twin coil bikes, and their VW22 is the ‘twin precious metal’ equivalent.
Alternator and Regulator/Rectifier

Dave has fitted the Sparx 3 phase alternator and combined regulator/rectifier.
Sparx was setup by Andy Gregory – the Triumph Parts Specialist – AKA Tricor Andy
Personally, I am not a big fan of Andy, or Sparx – having received very poor customer service from him in the past when trying to fix someone’s Triumph Bonneville wiring issues.
Sparx are also known for their aftermarket handlebar switches too.

I fitted a Sparx 3 phase high output alternator to a 1965 Triumph Bonneville T120 and wasn’t overly impressed.
The hole through the rotor was too small to fit over the crankshaft.
When questioned, I was told this was by design and that it should be broached on to the crankshaft by ‘whacking it on with a mallet’ then ‘graunching up’ the retaining nut.
That’s all well and good, but what about the poor guy that needs to get it off in the future?
Instead I used a reamer and reamed the hole out to fit. It was a nice snug fit, just like the Lucas rotors are right out of the box!

The rest of the alternator kit was OK.
The regulator/rectifier AC wires were all yellow and the alternator stator wires were green and white, which was a bit weird considering it was supposed to be one kit from one manufacturer – I was surprised they didn’t make an effort to standardise on wire colours.
Not a major issue though, and me just being a bit ‘nit picky’
One thing that did surprise me was the Instructions:
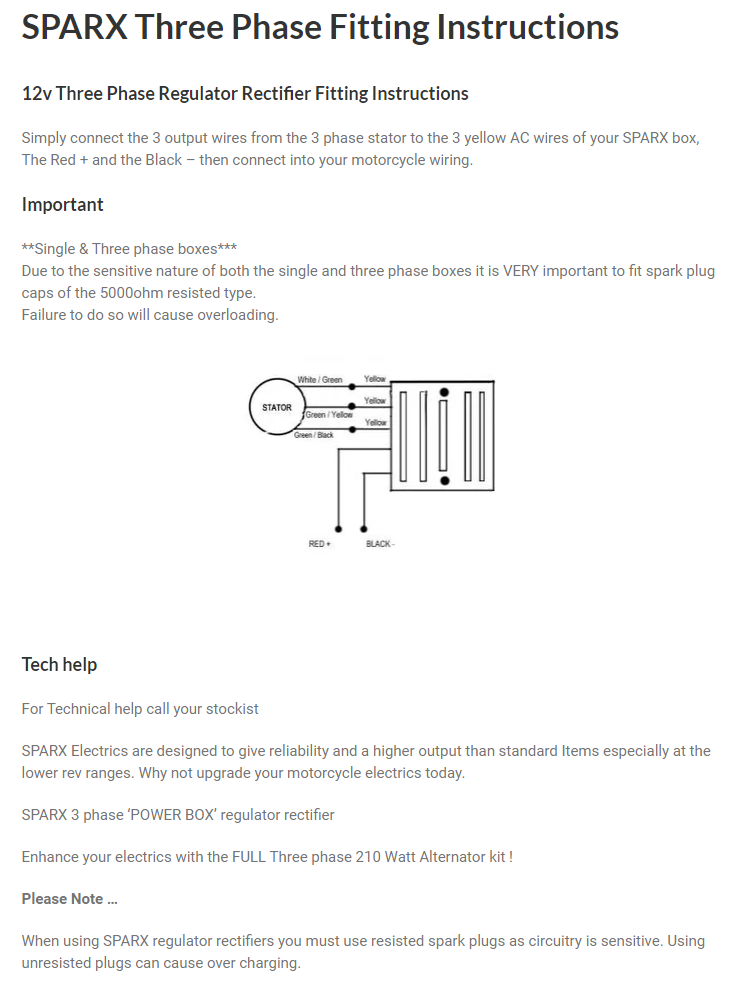
I was surprised that the instructions referred to using 5K resisted spark plug caps at the top of the page and stating that failure to do so will cause overloading.
Then at the bottom of the page it refers to using resisted spark plugs, as circuitry is sensitive and failure to do so will cause over charging.
These are the kind of disclaimers I would expect to see in the documentation of electronic ignitions, where there is a conversion of analogue rotation to a digital trigger signal, which can indeed be susceptible to radio frequency interference (RFI) or electro-magnetic interference (EMI)
Probably a sign here, I feel, that very poor quality components have been used.
There are five wires to connect:
| Wire Colour | Description |
|---|---|
| Yellow (x 3) | these are the AC input and pick up on the three wires coming out of the three phase alternator stator (connection can be any way round, as this is the AC side of the circuit) |
| Red | this is the Positive output and will join to one of the red wires in the harness |
| Black | this is the Negative output (known as the hot wire) – it will be wired to the NU (brown/blue) that goes back to the battery negative terminal via a fuse |
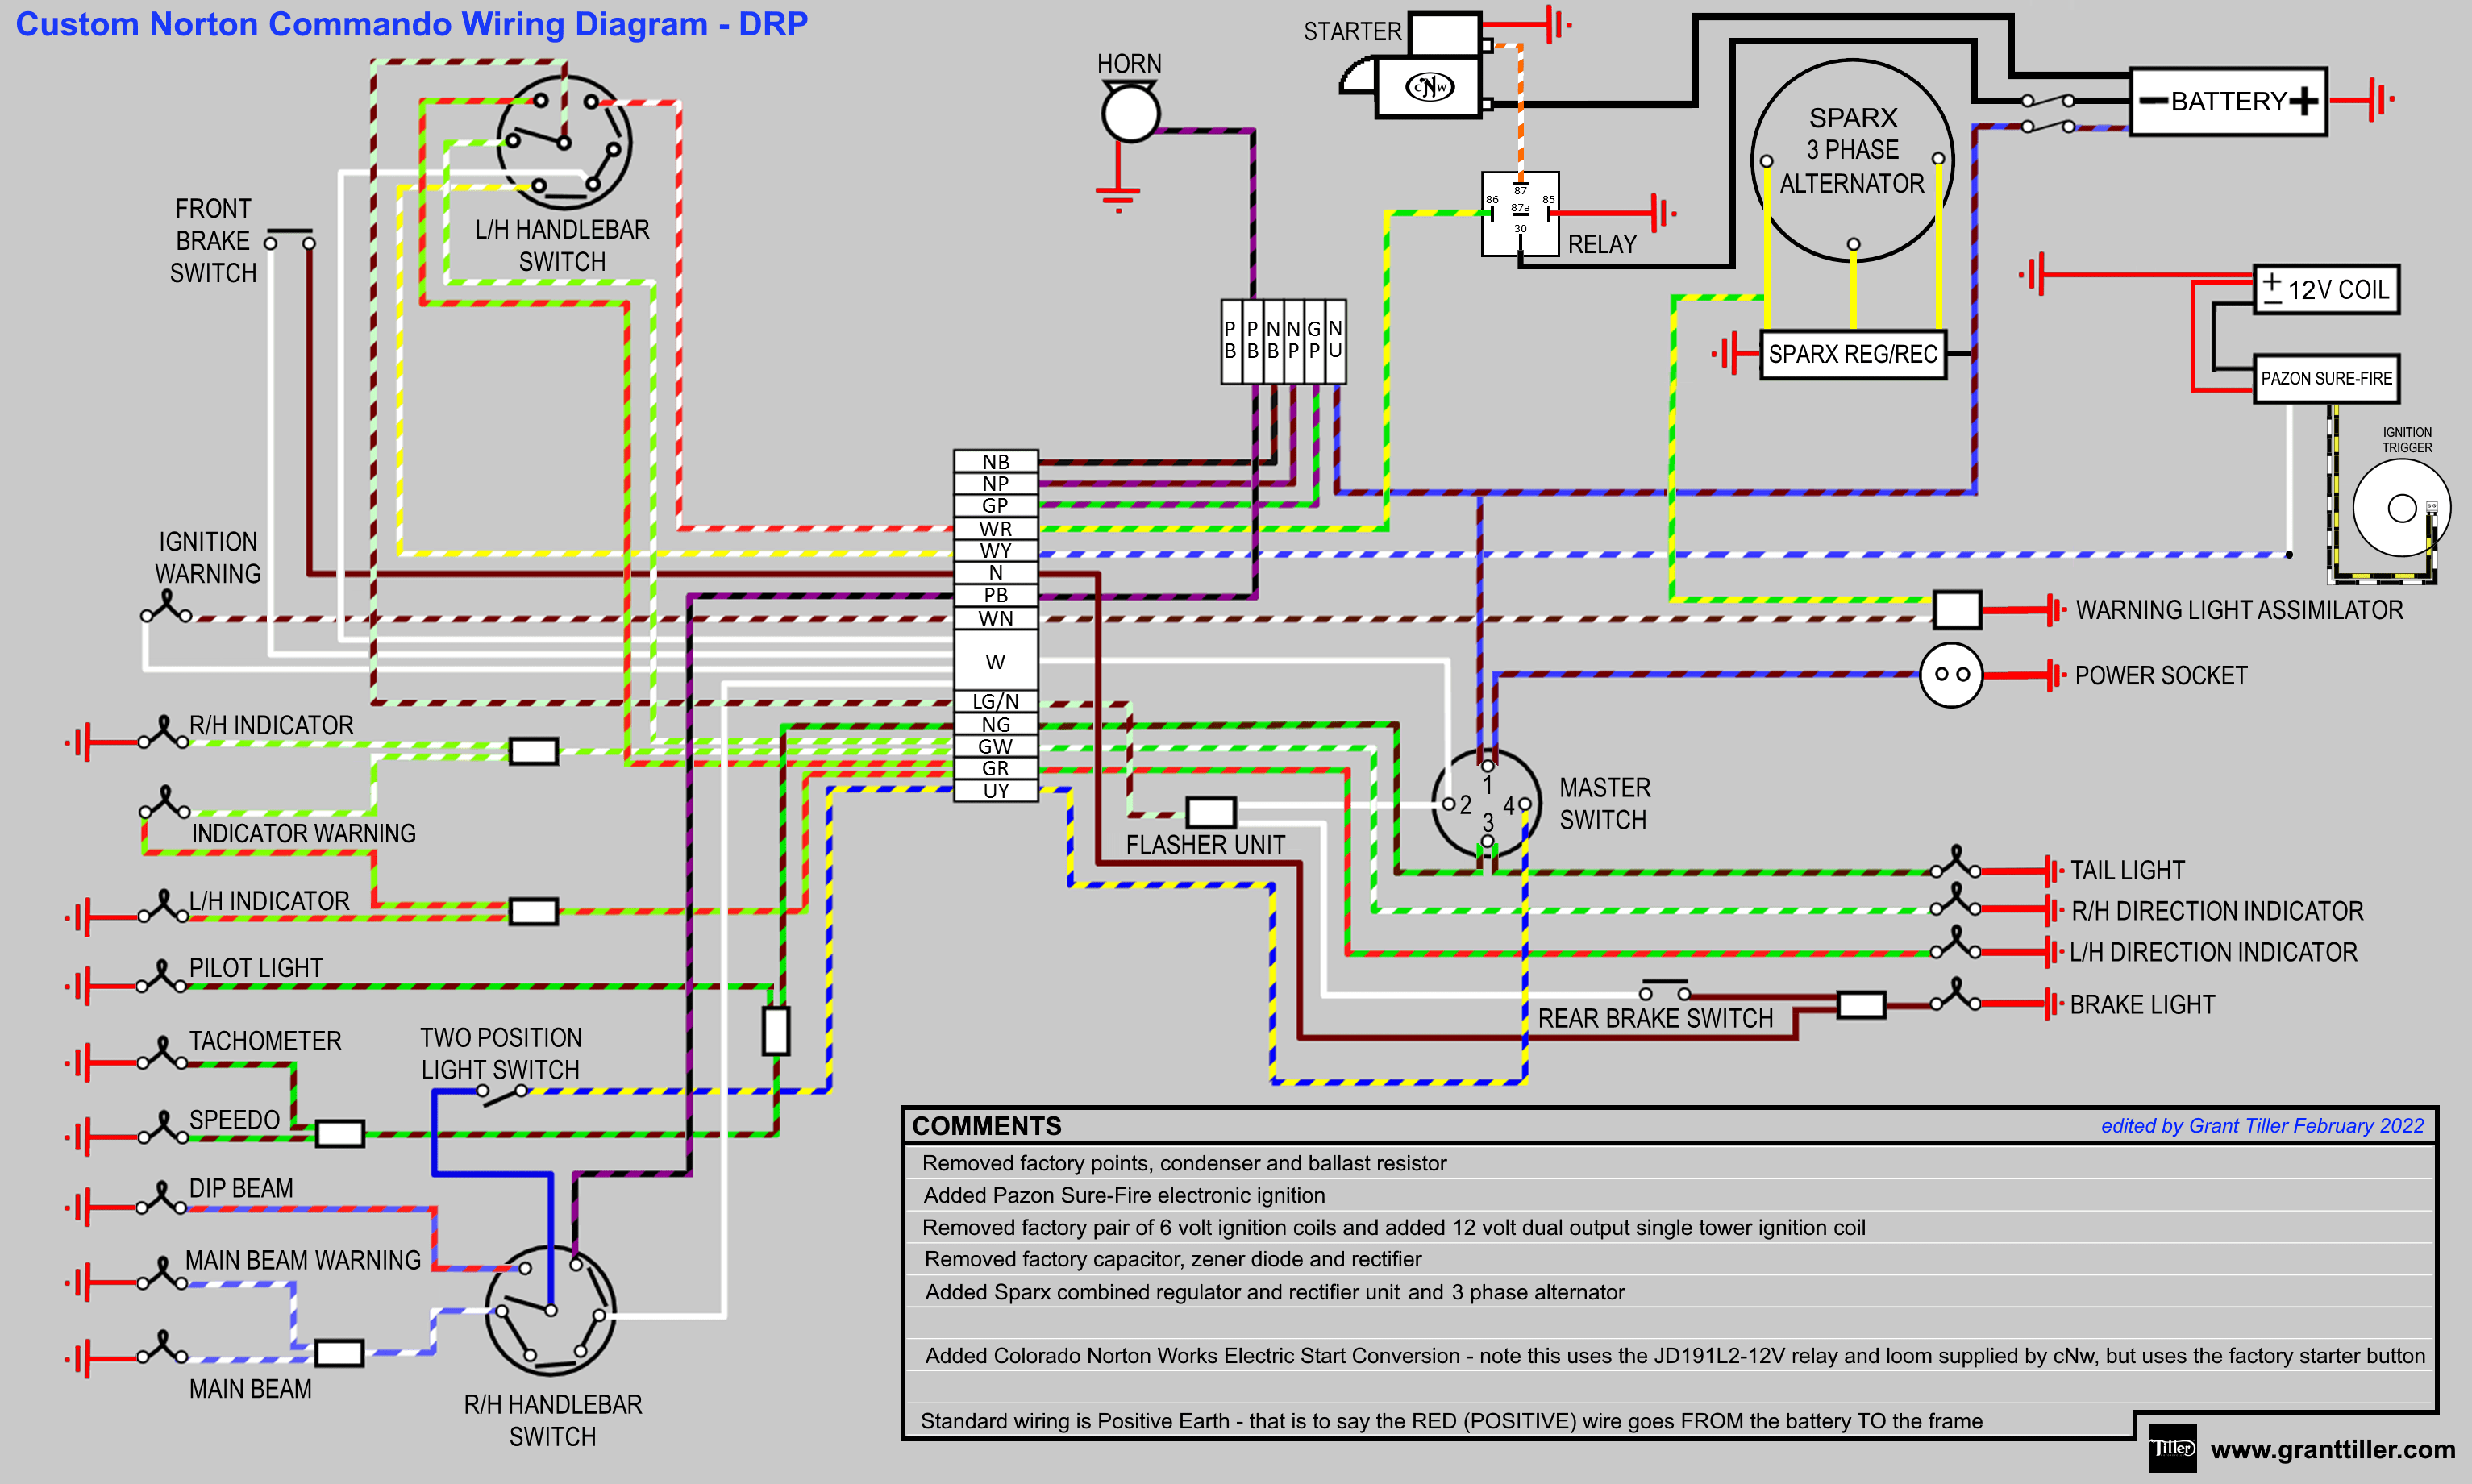
Wiring Diagram
Here is the Custom Wiring Diagram for Dave’s Commando.
Custom Norton Commando Wiring Diagram – DRP PNG 3066×1841
This is available as a PDF too – it can be downloaded here.
Simplified Wiring Diagram
Here is a simplified version of the same Custom Wiring Diagram for Dave’s Commando – I have removed a lot of the connector bulk under the fuel tank, the unused Interpol wiring, the Power Socket etc..
It is very easy to implement this using the standard wiring harness as the basis.
Custom Norton Commando Wiring Diagram – DRP (simplified) PNG 3066×1841
This is available as a PDF too – it can be downloaded here.

Warning Light Assimilators
It is important to note that MOST aftermarket reg/rec manufacturers do not support either the pre-MK3 Lucas 3AW silver can warning light assimilator OR the MK3 one.
Boyer Bransden are very explicit in their instructions for the Power Bow – they have even made an alternative Power Box model that includes a charge warning light.
Other manufacturers (PODtronics, SPARX and the Tri-Spark MOSFET units) either mention it in their smallprint/FAQs or neglect to mention it at all.
As such, I would recommend NOT using the original assimilator and consider your alternatives.
You could replace your assimilator with a solid state equivalent like the CoolCat Express (warning: you have to buy positive SS3AW-P or negative SS3AW earth)
Alternatively, you could follow my recommendation and buy a Charge Warning Light instead.
A warning light assimilator tells you that the alternator stator is producing an AC output, whereas a Charge Warning Light tells you that the battery is charging, the reg/rec is working and it gives you much more useful information about performance of the charging system and the state of charge.
I personally recommend the Improving Classic Motorcycles “Standard” Charge Warning Light. This model wires in to the standard incandescent lamp, so it looks better than a modern LED. It matches all your other warning lamps, which is particularly important on the MK3 with it’s instrument ‘console’
The ‘brainbox’ is about the size of a postage stamp, and can easily live inside the headlight bucket or under the MK3 ‘console’
Thanks, looks great. Your comment about the Sparx alternator bore size was interesting. I bought a pre-owned single phase alternator (but never used) on eBay years ago for $35.00 US (no comment regarding size discrepancy) and couldn’t get the rotor on the shaft. Luckily I have a .750 reamer and opened up the rotor. I also purchased the 3 phase Sparx alternator & regulator on eBay about 5 years ago for about $110 US. It has been sitting on the shelf until I bought the cNw estart. Again, I had to re-size the bore but this time with an adjustable reamer.